Resolución de problemas de bombas autocebantes: Una guía de diagnóstico de síntomas a causas
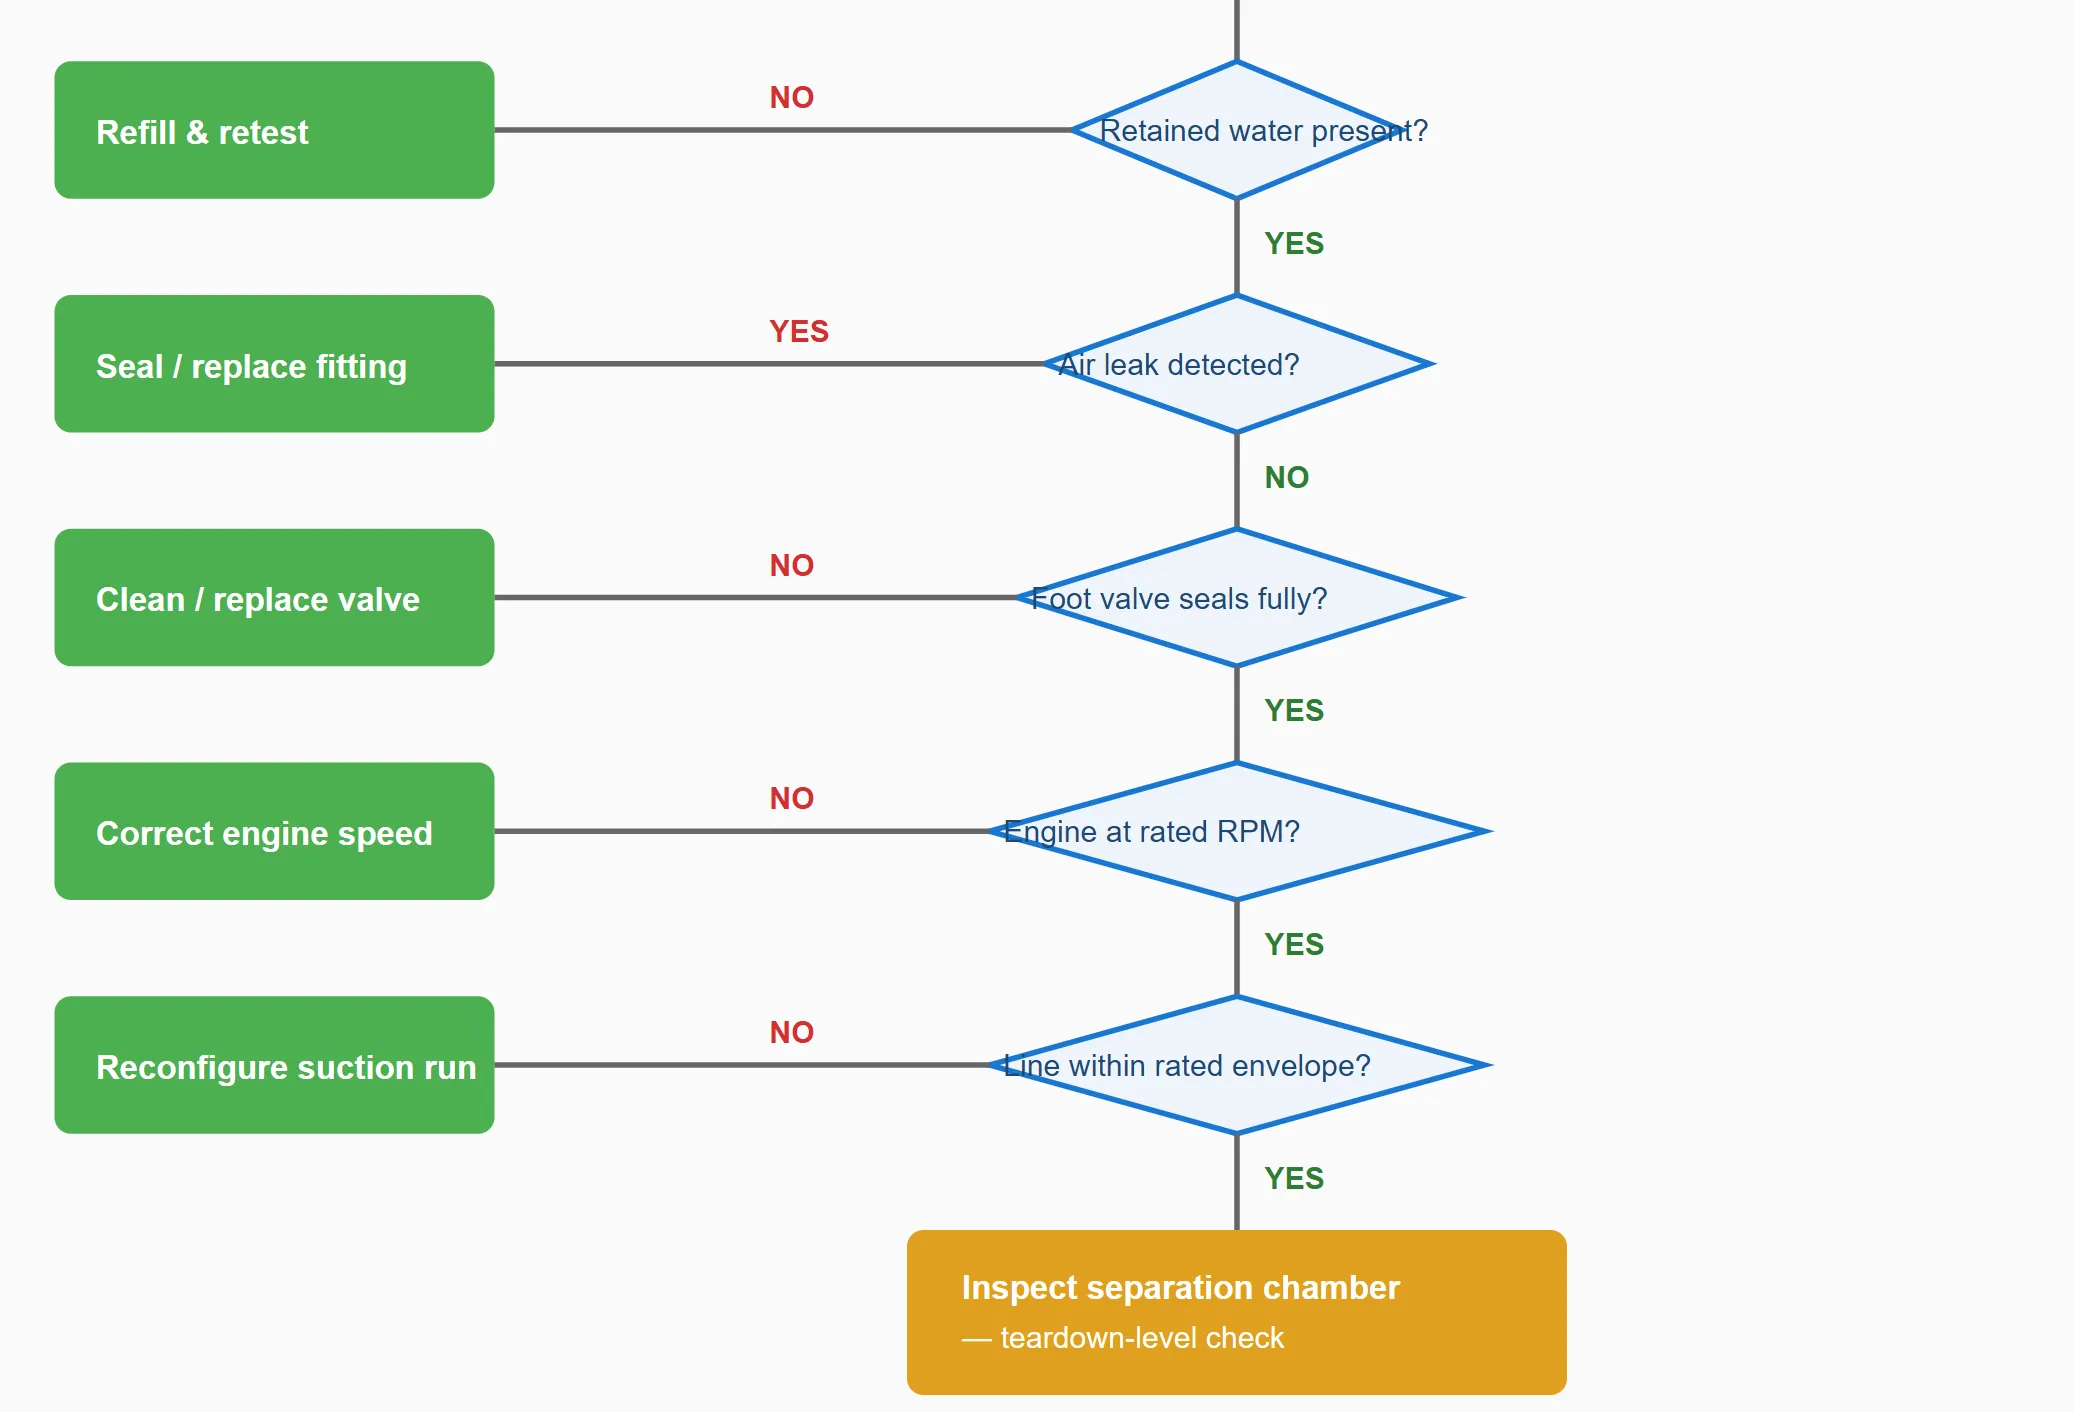
Knowing why a self-priming pump can fail to prime — covered in our How a Self Priming Pump Works article — is different from knowing what order to check things in when it actually happens on site. Several distinct faults produce overlapping symptoms, and checking in the wrong order wastes time on unlikely, expensive-to-verify causes before ruling out the cheap, likely ones. This works through six common failure symptoms in the diagnostic order that actually makes sense to check them, then consolidates the logic into a single field flowchart.
On This Page
- Why Diagnostic Order Matters More Than a List of Possible Causes
- Symptom: Pump Runs But Never Reaches Prime
- Symptom: Priming Takes Much Longer Than Expected
- Symptom: Primed Fine Before, Won’t Reprime Now
- Symptom: Pump Loses Prime During Operation
- Symptom: Excessive Noise or Vibration During Priming
- Symptom: Primed, But Flow or Head Is Reduced
- A Sequential Field Diagnostic Flowchart
- When to Stop Troubleshooting and Call for Service
- Frequently Asked Questions
Why Diagnostic Order Matters More Than a List of Possible Causes
Most self-priming pump symptoms have three or four plausible causes, and a technician who starts by disassembling the pump end to inspect the separation chamber — the most time-consuming check — before confirming something as simple as the retained water level is working backward. The efficient order is almost always: check the cheapest and fastest things first, in order of how commonly they’re actually the cause, and only escalate to teardown-level inspection once the simpler checks have been ruled out. The sections below are written in that order for each symptom, not in order of mechanical severity.
Symptom: Pump Runs But Never Reaches Prime
The engine runs and the impeller turns, but no flow ever establishes at the discharge, no matter how long it runs. Check in this order:
Symptom: Priming Takes Much Longer Than Expected
The pump eventually reaches prime, but takes noticeably longer than its rated figure or its own prior performance on the same setup. Check in this order:
Symptom: Primed Fine Before, Won’t Reprime Now
The unit worked correctly on a previous startup, sat idle, and now won’t reprime on restart. This points specifically toward something that changed between shutdown and restart, not a design or wear issue that would have shown up before. Check in this order:
Symptom: Pump Loses Prime During Operation
This is a distinct symptom from anything above — the pump primes successfully and runs normally for a period, then loses flow mid-operation rather than failing to prime at startup. The diagnostic logic is different because the fault is occurring while the line is already flooded, not while it’s being evacuated. Check in this order:
Symptom: Excessive Noise or Vibration During Priming
Some rattling and gurgling noise during priming is normal and expected — it’s the audible signature of turbulent air-water churn inside the casing, and it should settle into a smoother, quieter tone as the suction line floods and the pump approaches full prime. The diagnostic distinction is duration and pattern, not the presence of noise itself:
Symptom: Primed, But Flow or Head Is Reduced
This symptom is worth separating explicitly from a priming problem, because it’s frequently misdiagnosed as one. If the pump reaches stable flow — no continued churning noise, no fluctuation — but that flow or discharge pressure is below expected values, priming itself completed successfully and the cause lies elsewhere: impeller wear or damage, a partially clogged impeller or volute (especially relevant on solids-handling variants such as a Self-Priming Diesel Trash Pump, including our trailer-mounted configuration, where debris can lodge in the impeller passages after a fully successful prime), or a system curve mismatch where actual site conditions call for a different operating point than assumed. Reopening the priming mechanism itself in this situation is the wrong diagnostic direction — the priming system already did its job.
A Sequential Field Diagnostic Flowchart
When to Stop Troubleshooting and Call for Service
If the flowchart above leads to separation chamber inspection, or if cavitation-pattern noise persists after confirming suction conditions are within the rated envelope, further disassembly risks damaging components that are expensive to replace if handled incorrectly — a casing gasket surface scored during an improper teardown, or a chamber baffle bent during inspection, can turn a wear issue into a bigger repair than the original fault. At that point, verified diagnosis from an engineering support contact is generally more cost-effective than continued field disassembly.
Frequently Asked Questions
Q: Is it normal for a self-priming pump to make loud gurgling noises while priming?
A: Yes — this is the audible signature of the air-water churning and separation cycle, and it should progressively quiet down as the suction line floods. The diagnostic concern is noise that doesn’t diminish within the expected priming window, not the presence of noise itself.
Q: My pump primed fine all week and suddenly won’t reprime this morning — what changed?
A: This specific pattern points toward retained water loss between shutdown and restart — most commonly a foot valve that isn’t sealing fully, letting water drain back down the suction line overnight, rather than a wear issue that would have shown up earlier in the week.
Q: The pump lost flow partway through a job that had been running fine for hours — is this the same as a priming failure?
A: It’s a related but distinct symptom. A mid-operation loss of prime usually traces to something that changed during the run — a dropping source water level, a fitting loosened by vibration, or cavitation — rather than the startup priming mechanism itself, which already completed successfully before the loss occurred.
Q: If the pump reaches full prime but flow is lower than expected, should I inspect the priming system?
A: No — if priming completed (stable flow, no ongoing churning noise), the priming mechanism did its job. Reduced flow or head after a successful prime points toward impeller condition, a partial blockage, or a system curve mismatch, not the priming components.
For a fault pattern that doesn’t match any of the above, or before disassembling a separation chamber for the first time, contact the CANNASPRING engineering team with the specific symptom and what’s already been checked.